 My brand new nephew paid us a little visit not too long ago, it was his first trip to Wales and what better place to start than in the beautiful Conwy Valley?
So I decided to take a break from the papier mache marathon that is my new window display and make him a little pressie inspired by his name, Sonny Storm, and my favourite weather, sunshine and showers.
It was pretty easy to make and based on a tin version I made a few years ago for another little lovely. This version is in my new favourite material, felt.
Here’s how to make one for yourself….
You will need:
White, yellow and rain coloured felt (I used a nice mix of greys and blues)
Cardboard, the back of a sketchbook is perfect (you could use stiffened felt and avoid making a cardboard insert if you wanted to)
White, yellow and rain coloured threads
A bit of ribbon for hanging
Needle
Scissors
Fabric glue (optional)
Here’s how…..
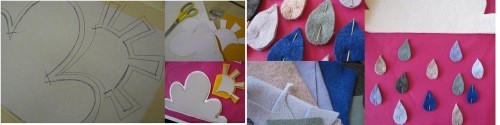
Draw your design on paper and cut out the separate pieces needed, I drew a fluffy cloud with the sun peeping from behind it for my design.
Fold your white and yellow felt pieces in half so that you have two layers and pin your pattern pieces to them. Cut around the pattern pieces remembering to extend the sun a little to fit neatly between the two cloud layers (see pic). Unpin the pattern pieces.
Now place your pattern pieces on your card and draw around them. Remove your pattern and draw a line about 5mm in from the edge of the shapes you’ve drawn and cut out your card pieces along the inside line. These shapes will help to stiffen your cloud and sun.
Make 5 holes along the bottom of your cloud for attaching your rain drops later.
N.B. when cutting the card for the sun you will not need to extend it to fit in between the clouds.
I cut out my raindrops freehand just by pinning two pieces of felt together and cutting out the shapes I wanted.
At this point it’s helpful to lay out your pattern pieces and organise your raindrops to take a photo to be able to refer back to later on.
Use a running stitch to sew around the edge of each raindrop and put them all to one side.
I used a little fabric glue to stick the card to the inside of my cloud and sun, just enough to stop it slipping about when I stitched them together. Once the glue has dried (if using) use a running stitch to sew around the edge of the sun then slip it in between the two cloud layers and stitch around the edge of the cloud leaving the bottom edge open for now.

To attach the raindrops tie a knot in the end of a length of thread and thread a needle with it. Pass this in between the two layers of one of your bottom raindrops (from bottom to top) gently pulling the knot though to the inside but not out of the top. Tie another knot about four inches from the first and do the same for the next raindrop. Continue in this way until you have a string of rain drops then pass the needle through one of the holes you made in your cardboard cloud and tie it on. Do this for all of your rain drops.
Finish sewing along the bottom of your cloud.
Finish off your weather mobile by sewing a little ribbon loop on the back to hang it up with.
You’re done, stand back and admire your work!

Hey guys, it would be super cool if you could share your pics of your finished mobiles on my facebook page! I look forward to checking them out!


